We all have had instances where we needed to use the CRM to manage a record-specific document. Integrating our power app, model-driven app, or customer engagement app with SharePoint is one of the best options for document management. SharePoint Server is a content management and collaboration tool that makes it easier for users to share, store and find information. By providing safe access to the documents and data needed to make business decisions, it facilitates effective collaboration.
Microsoft provides native SharePoint integration in Dynamics 365. With the help of the SharePoint integration feature, you can store and manage documents on SharePoint within the context of a Dynamics 365 App record and utilize the document management features of SharePoint in Dynamics 365 CRM, such as checking documents in and out, viewing version histories, and changing document properties.
Benefits of SharePoint Integration
SharePoint integration provides the following benefits:
- Modern user interface that is consistent with the current user interface.
- Users only need to sign in once, saving them from having to sign in to both SharePoint and customer engagement apps.
- Compared to Dynamics 365, SharePoint provides a lot more storage space. No more being concerned that your D365 instance will run out of storage, and no more rising costs as a result of having to increase your storage limits!
- SharePoint installation requires no additional software.
- SharePoint documents will appear in lists.
- Users can perform SharePoint actions from the command bar.
- Document management allows users to create and view folders in SharePoint from within CRM.
Document management requirements
- SharePoint – You can use any of the SharePoint versions listed below:
- SharePoint in Microsoft 365
- SharePoint 2016 on-premises
- SharePoint 2013 SP1 on-premises (or a later version)
- SharePoint site collection – You must configure and make available at least one site collection for your app.
- Server-based SharePoint integration must be enabled.
Set-up SharePoint Integration
- Ensure that you have the System Administrator security role or equivalent permissions or have Read and Write privileges on all record types that are customizable in Microsoft Dynamics 365.
- Open the Power Platform admin center and select an environment.
https://admin.powerplatform.microsoft.com/environments - Select Settings → Integration → Document management settings, and then click on Enable server-based SharePoint integration.

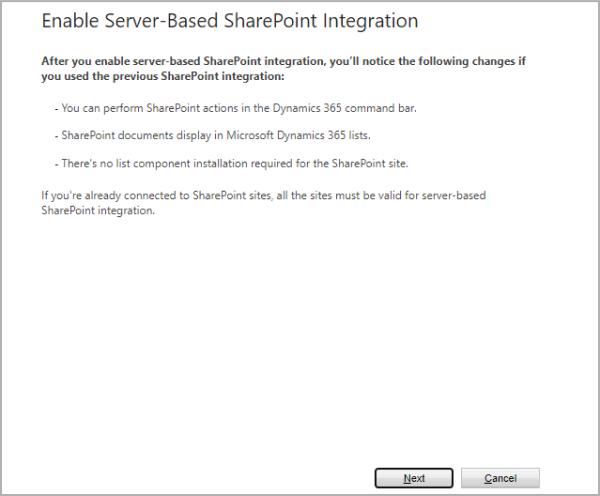
5. Choose Next in the Enable Server-based SharePoint Integration alert.
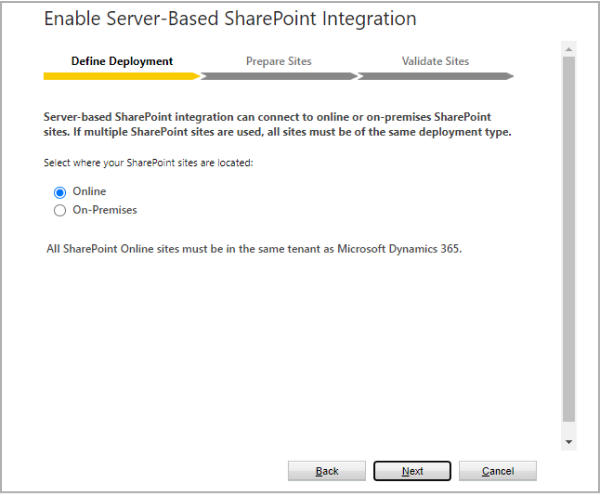
5. Choose where your SharePoint sites are located (Online or On-Premises), and then click on Next.
6. If your customer engagement apps are not already linked to a SharePoint site, enter the URL (for example, https://contoso.sharepoint.com) of your SharePoint site that will be used for auto folder creation, and then choose Next.
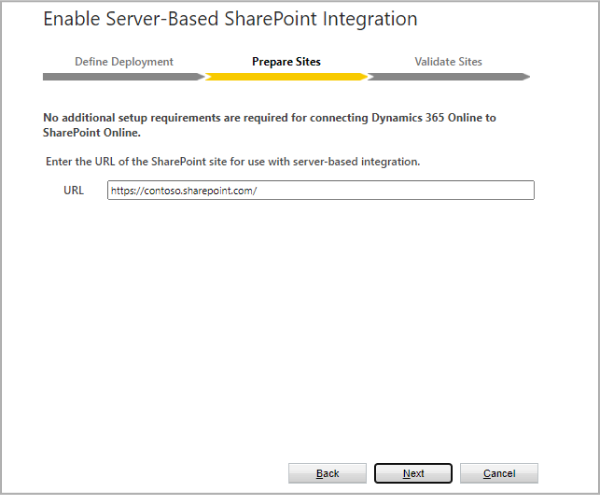
The URL will be validated to ensure that it is a valid SharePoint online site in the same Microsoft 365 tenant as your organization. You cannot revert to the previous client-side SharePoint integration after enabling server-based SharePoint integration. Select Enable.
Enable SharePoint document management for specific entities
- Make sure you have the System Administrator security role or equivalent permissions in Microsoft Dynamics 365 or verify that you have Read and Write privileges on all record types that are customizable.
- Navigate to the Power Platform admin center and select an environment.
https://admin.powerplatform.microsoft.com/environments - Select Settings → Integration → Document management settings → Document Management Settings.
- Choose the entities for which you want to manage SharePoint documents. If not already specified, enter the URL of the SharePoint site where the document locations and folders for storing documents will be created, and then click Next.
- Choose the appropriate server-based integration options.
- Check “Based on entity” to have document libraries and folders created on the SharePoint site based on the Account/Contact entity.
- Select Account – The structure will include the account as the primary folder, as well as sub-folders based on the actual account names that will be created under it.
- Select Contact – The structure will begin with the contact primary folder, and sub-folders will be created under it based on the actual contact names.
- If you do not want folders automatically created, clear the “Based on entity” check box.
- Click on Next.
- Check “Based on entity” to have document libraries and folders created on the SharePoint site based on the Account/Contact entity.

4. An alert will be displayed for the creation of document libraries in SharePoint. Click OK.
5. The document library creation status will be displayed and click Finish.
Uploading/Viewing SharePoint Documents from CRM
The integration is now fully operational! You will now see a “Documents” tab when you open the records of entities that you have enabled for document management in Dynamics 365 CRM. In the screenshot below, you can see the document that we created for an account. Notice that its storage is on SharePoint.

The files will be displayed as shown below in SharePoint.
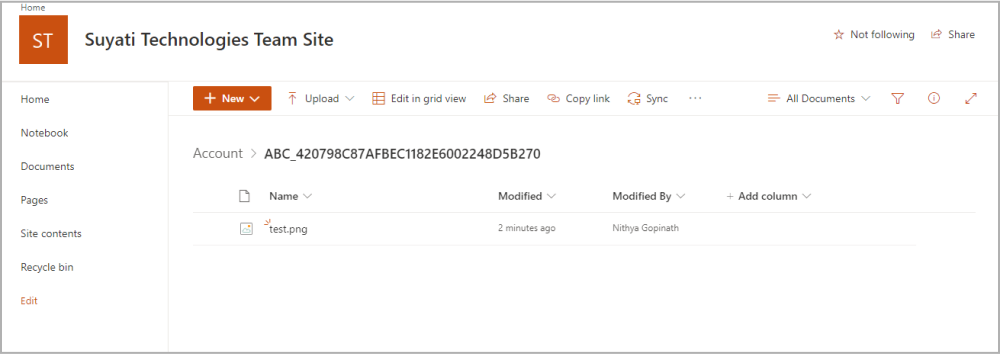
We can view the documents, upload new files and create new folders in SharePoint directly from CRM.
SharePoint Sites and Document Locations in CRM
We make use of two entities in CRM to store the SharePoint Site information and the document location information of a record in CRM.
- SharePoint Site
- SharePoint Document Location
A. SharePoint Site
It holds the information of the SharePoint site from where documents can be managed in Microsoft Dynamics 365. The system administrator specifies the SharePoint Server site collection or the SharePoint Server site URL by using the SharePointSite entity in CRM. We can configure multiple SharePoint sites in CRM that will allow the same record in CRM to point to two different locations in different SharePoint sites.
Creating or Editing SharePoint Sites
- Make sure you have the System Administrator security role or equivalent permissions in Microsoft Dynamics 365.
- In the Power Platform Admin Center, select an environment.
- Go to Settings → Integration → Document management settings.
- Choose SharePoint Sites.

5. All the existing SharePoint sites will be listed as follows. To edit any site record, you can open the record and make the relevant changes. Select New to create a new record.

6. Provide the values for different fields in the form.
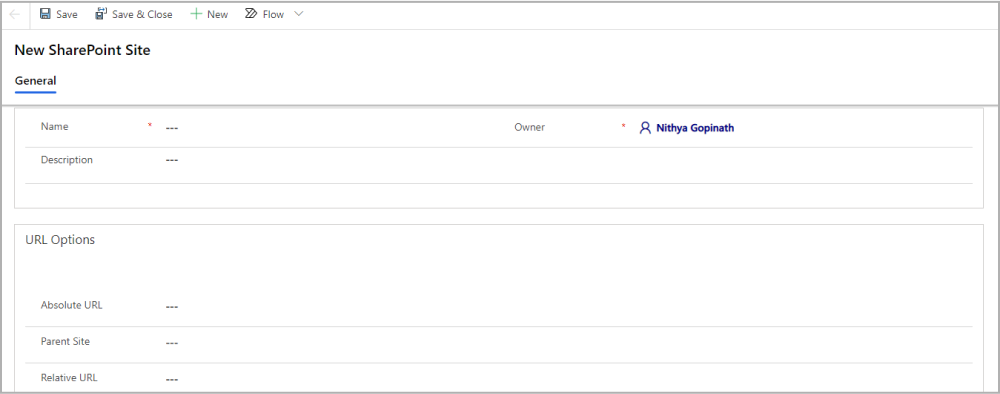
1. Name – Provide the name of the site.
2. Owner – By default, the person who created the site is listed as the owner of the site record.
3. Description – Add a description for the site. For example, specify what documents the site contains.
4. Specify whether you want to add an absolute (full) or relative URL for the site.
a. Absolute URL – Provide the fully qualified URL of the site collection or the site in SharePoint to which this site record should be linked.
b. Relative URL – You can select a site record as the parent site and specify the relative URL, if you have at least one site record connecting to a site collection in SharePoint.
7. Select Save and Close.
B. SharePoint Document Location
It stores the information of document libraries or folders on a SharePoint server, from which documents in Microsoft Dynamics 365 can be managed. SharePoint document locations are records in customer engagement apps (Dynamics 365 Sales, Dynamics 365 Customer Service, Dynamics 365 Field Service, Dynamics 365 Marketing, and Dynamics 365 Project Service Automation) that point to a SharePoint document library or folder.
Document libraries or folders must be in place to store documents for records. If the customer engagement apps are unable to create the document libraries and folders automatically, you can do so manually in SharePoint. After creating the document libraries and folders in SharePoint, you must create document location records in customer engagement apps that point to these SharePoint document libraries and folders.
Creating or Editing SharePoint Document Locations
- Make sure you have the System Administrator security role or equivalent permissions in Microsoft Dynamics 365.
- In the Power Platform admin center, select an environment.
- Go to Settings → Integration → Document management settings.
- Choose SharePoint Document Locations.

5. All the existing document locations will be listed as shown below. We can open any of them and edit them as required. If you need to create one, choose New.

6. Specify the following information as required:
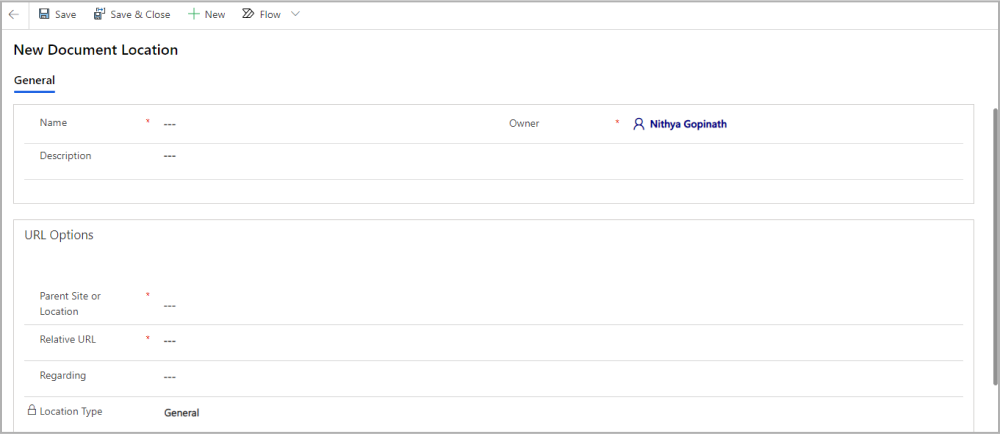
Name – Type a name for the document location.
Owner – By default, you are added as the owner of this location record.
Description – Type a description for the document location.
Parent Site or Location – A relative document location to the existing site or document location record. Choose the Lookup button. In the Look Up Record dialog box, in the Look for list, select the type of record as SharePoint Site or Document Location and find the record you want to select.
Relative URL – Name of the SharePoint folder.
Regarding – Choose the Lookup button. In the Look Up Record dialog box, in the Look for list, select the type of records you want to find. Search for and select the record for which you want to create the location record and choose OK.
7. Choose Save and Close.
Conclusion
In this article, we have discussed the out-of-the-box SharePoint integration in Dynamics 365. We familiarized ourselves with how to enable the integration and how to choose entities for document management. We have also covered managing the files for a specific Dynamics 365 record in the corresponding location of the SharePoint server. I hope you find this article helpful.


