Salesforce periodically offers release updates to improve logic, performance, usability, and security of their products. Their release notes offer a brief, high-level description of the new features and improvements, and include set-up details, tips on how to get started, and best practices that ensure your success continuously.
The most recent Salesforce update, the Spring’23 release, enables you to improve efficiency and drive cost savings, with numerous innovations. The Salesforce team @Milestone has compiled this quick snapshot.
Important Spring’23 Release Updates
1. Enabling Greater Protection for Your Users’ Personal Information
With the Enhanced Personal Information Management update, users can be assured that their data is in a secure framework. In the recent Salesforce Spring’23 release, the Personal Information Management setting has been activated to stop external users (community or portal users) from accessing others’ personal information. This feature which substitutes the Hide Personal Information setting, safeguards the user record fields pertaining to Personally Identifiable Information (PII).
How to Offer Protection for Your Users’ Personal Information?
From the Setup option in the ‘Quick Find’ bar, key in User Management Settings, and then select User Management Settings. To view and modify the concealed fields, click on the field set.
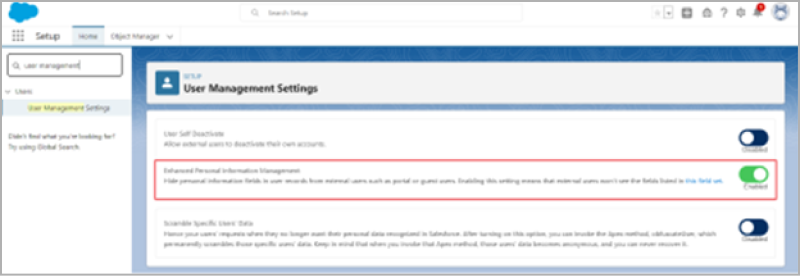
Image courtesy: https://www.salesforceben.com/enhanced-personal-information-management-what-you-need-to-do/
Customizing the PII Fields
To modify the PII Fields, you are required to carry out the following:
1. In the User Management Settings tab, click on the field set link under the Enhanced Personal Information Management setting.
2. In the next page, add or eliminate fields from the In the Field Set segment.
3. Click Save when you have finished with adding/eliminating fields.
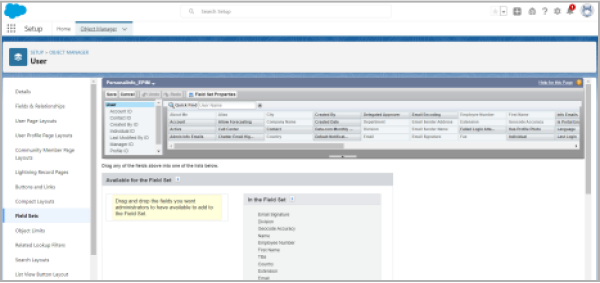
Image courtesy: https://www.salesforceben.com/enhanced-personal-information-management-what-you-need-to-do/
For those customers who have enabled the Hide Personal Information setting, but have not enabled the Enhanced Personal Information option, Salesforce hides these fields in the user records from the external users, in Spring ‘23.
● Alias
● Employee Number
● Federation Identifier
● Sender Email
● Signature
● Username
● Division
● Title
● Department
● Extension
When the Show Nicknames option is activated, these fields are also concealed.
- First Name (Name field component)
- Last Name (Name field component)
- Name
2. Deploying Enhanced Domains
Another major Salesforce Spring’23 release update – Salesforce plans to implement enhanced domains. They offer support for an organization to adhere to the latest browser and security standards. Once the deployment is completed, the My Domain field specific to a particular company is attached to the URLs that Salesforce hosts for your org.
The domain formats that maintain consistency contribute to a great user experience and standardizing URLs, so that they can be used in API calls and custom codes. This further helps the users to access Salesforce from those browsers that obstruct third-party cookies. Some of the major areas of impact for enhanced domains are application and login URLs such as Salesforce sites, Experience Cloud sites, content files, and Visualforce pages.
In addition, this feature causes changes in domain suffixes (the section that comes after My Domain field) to comply with the latest security standards. As there are no instance names, the users can easily remember the enhanced My Domain URLs, which do not change when your org is shifted to a different Salesforce instance. However, a sandbox login URL changes with the enhanced domains, as it contains the word ‘sandbox’. Enhanced domains offer several benefits including branding, stability, and compliance.
How to Enable Enhanced Domains?
Before you proceed to update production, it is recommended to test the entire My Domain changes occurring in the sandbox. A message that pops up on the My Domain Setup page specifies whether the enhanced domains are slated to be deployed automatically in Spring ’23. In this case, the admins also get a reminder to enable the feature.
3. The MFA Auto-Enablement Release
Salesforce has recently announced that they will begin with the process of enabling MFA automatically on production orgs in different phases, through the MFA Auto-Enablement update in the Spring’23 Release. As of February 1st, 2022, Salesforce has requested all customers to apply Multi-factor Authentication (MFA) while accessing their products. The Salesforce update regarding MFA Auto-Enablement is to help customers meet the afore-mentioned requirement. For orgs that come under the first phase, the MFA would be auto-enabled during the Spring’23 Release, and for those in the second phase, it would be auto-enabled with the Summer’23 Release. For those orgs that do not fall under Phase 1 or Phase 2, the updates would be made available through a later release.
Why Does this Change Happen?
As cyberattacks are quite common today, passwords fail to offer enough protection against unauthorized access. MFA offers additional protection against threats such as phishing, thereby improving security for your clients and business.
What Will Change?
When MFA gets enabled, there will be a change in the logging in process to the User Interface (UI). After a user enters his username as well as password, he needs to verify his identity through an MFA verification method including:
● Authenticator App
● Security Key
● Built-In Authenticator
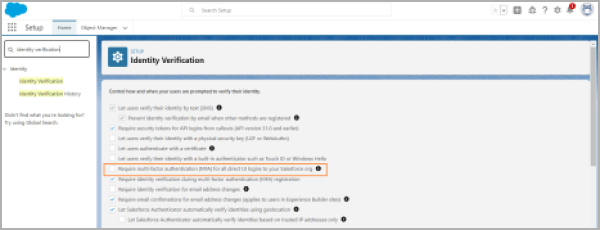
Image courtesy: Everything You Need to Know About Multi-Factor Authentication for Salesforce Orgs
Key Features and Functionalities to Leverage Upon
1. Know Who Can Access Records and Why
The records are normally shared on an ownership basis, or as per pre-defined sharing settings, or through manual mode. To understand the sharing process and the levels of access, the users need to check the sharing hierarchy of the records.
To view the list of users who can access the records, click on Sharing Hierarchy from Action Menu on the relevant record. To get the details of why the user can access the record, or why his access is blocked, click on View option beside the username.
2. Enhancing Case and Lead Record Pages with Dynamic Forms
Configuring the case and lead record pages with Dynamic Forms helps to make them strong. This feature takes the Lightning App Builder to a different level. It facilitates greater flexibility and offers dynamic experiences to the users. Previously, this feature was available only for person account, account, opportunity, and contact record pages. Open a lead record or case page in the Lightning App Builder and select the new Fields tab. Then place Field Section element somewhere on the page and drag the fields that are inside this component. Alternatively, automate this process by migrating the Record Detail element to use Dynamic Forms with the single click of a button.
Dynamic Forms offer:
- An instantaneous upgrade from the page layouts: Here you can place sections and fields wherever required.
- Dynamic layouts: The visibility rules help you to show and hide both sections and fields.
- Greater simplicity in layout management:
- It helps you to deal with fields and sections on the respective pages in the Lightning App Builder, without disturbing page layout editor.
- It helps you minimize the number of page layouts and record types using component visibility rules.
- It helps to obtain a single assignment model for Lightning page, instead of a dual model that assigns a Lightning page and a page layout.
Here are some of the core objects that make Dynamic Forms accessible:
- Accounts (both ‘Business’ and ‘Person’)
- Opportunities
- Contacts
- Lead
- Case
This change is applicable for Lightning Experience in Professional, Group, Enterprise, Unlimited, Developer, and Performance editions. The Dynamic Forms enable you to migrate the sections and fields from the respective page layouts as discrete components, thereby keeping your data neat and organized.
How to Create a Form in Salesforce?
- Create a fresh Lightning Page
- Upgrade Record Detail Page
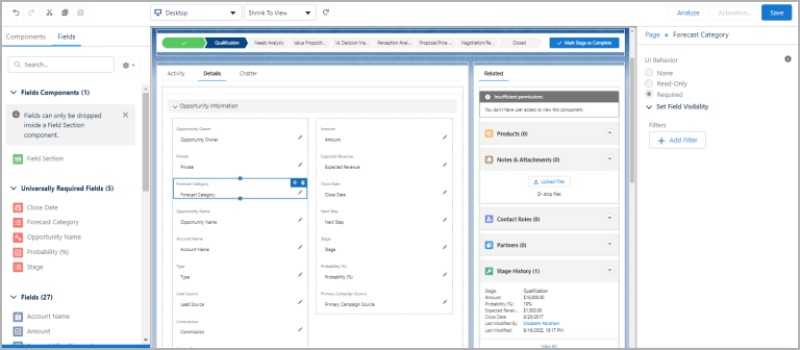
Image Source: Dynamic Forms in Salesforce [with Winter ’25 Updates]
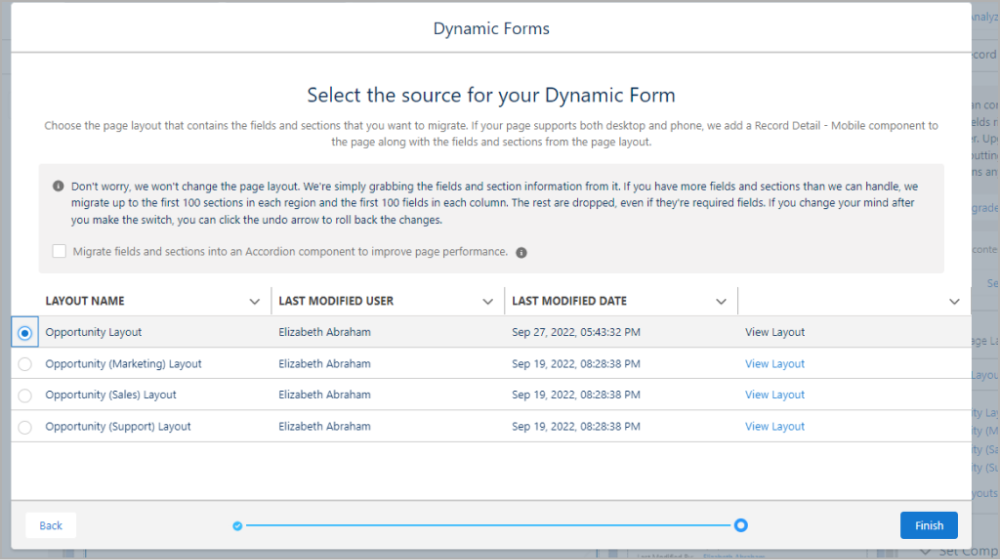
Image Source: Dynamic Forms in Salesforce [with Winter ’25 Updates]
Click Upgrade Now on the component detail pane to start the wizard for Dynamic Forms migration. Select the page layout that contains the fields you wish to migrate to the respective page. The upgrade wizard uses the fields and sections option from the selected page layout and automatically includes them in your page.
- Add or Remove fields and section.
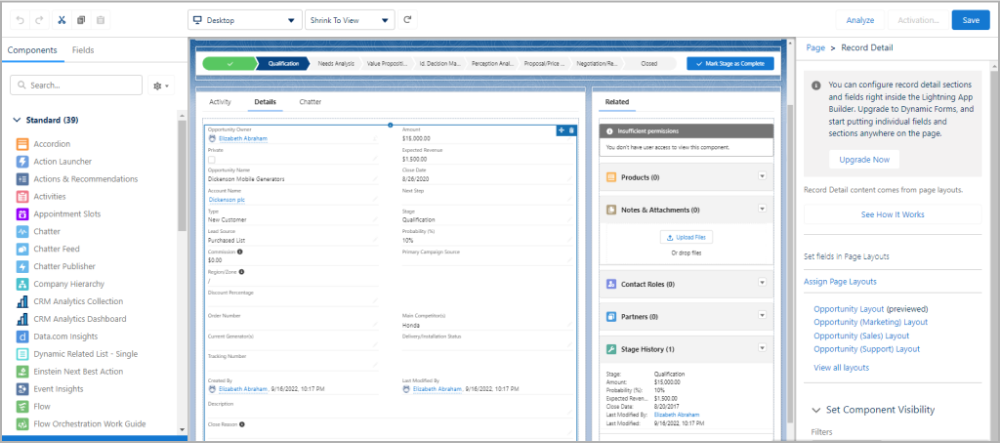
Image Source: Dynamic Forms in Salesforce [with Winter ’25 Updates]
You can add or remove fields from the field panel as needed. Save and check the record detail page.
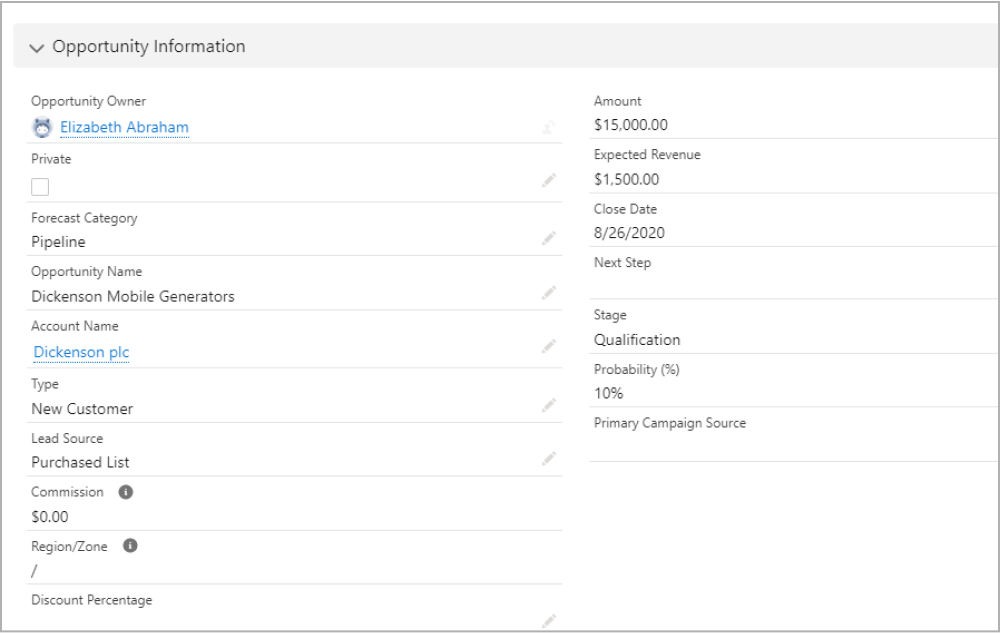
Image Source: Dynamic Forms in Salesforce [with Winter ’25 Updates]
Click on the save and check the Record Detail Page. Here, you can view fields included by the dynamic form builder.
3. Converting Processes to Flows with ‘Migrate to Flow’ Tool
As Process Builders and Workflows are expected to attain superannuation soon, the focus has been shifted to the new tool that can offer support to convert the prevailing automation to Lightning Flows. In fact, Flows can outperform processes in every aspect.
The Migrate to Flow tool offers support only for the record-triggered processes, while custom events and invocable type processes have been excluded. Further, the processes that include scheduled actions, field traversals, and custom metadata types are not supported.
For the supported processes, migration of action items including Record Create, Record Update, Invoke Apex, Invoke Flow, and Email Alert becomes easier.
This change applies to Salesforce Classic and Lightning Experience in Professional, Essentials, Performance, Enterprise, Developer, and Unlimited editions.
Advantages of Converting Processes to Flows Using ‘Migrate to Flow’ Tool
- Improved performance: Flows becomes quicker and more competent than processes, particularly in the case of complicated processes that include numerous stages and conditions.
- Enhanced user experience: Flows offer an improved user-friendly interface for automating various tasks and processes, thereby making it easy for users to comprehend them.
- Improved reporting: Flows offer vigorous reporting abilities, making it easy to track and evaluate the performance of automated operations.
- Improved flexibility: Flows offer many options for regulating and customizing processes, thereby making it easy to upgrade as per the business requirements.
How to Enable This Feature in Our Org?
From Setup option in the Quick Find bar, type Migrate to Flow. Then select Migrate to Flow. On the subsequent page, choose the process that you wish to convert into a flow. Then click on Migrate to Flow. After that, choose the criteria that you wish to migrate to the flow. After the process has been migrated, you can test the flow in the Flow Builder. If everything functions as anticipated, you can activate the flow, and deactivate the process that you have converted.
Different Possibilities to Refactor the Existing Implementations
1. Restricting the Number of Dormant Picklist Values
This update has been designed to enhance the org performance and health by limiting the number of dormant picklist values in a customized picklist field. In fact, this update cuts off the ability to have an infinite number of dormant picklist values. This update has been announced in Spring ’23 and will be enforced in Summer ’23.
After the enforcement of this update, you will not be able to eliminate the upper bound on inactive picklist values, and it will give a maximum of 4,000 picklist values.
2. Preventing Duplicate Cases with Lightning Threading in Email-To-Case
Lightning threading is a different approach in E-mail-to-Case threading that matches the inbound e-mails to cases with the help of a token- and header-based threading combination. This method enables Email-to-Case to locate the corresponding cases, thereby preventing the creation of a new case when an associated case exists.
In the Lightning threading approach, Email-to-Case tucks a token – a configured string that adheres to the Salesforce security standards – into the email subject or body of an outbound email on a specific case. When the customers send a response, the Email-to-Case searches for tokens that match the inbound messages to the concerned cases. If no exact match is detected, the Email-to-Case also checks through the metadata in the email header. If the token-and-header-based threading combination fails to detect a matching case, then the Email-to-Case generates a new case.
How to Enable this Feature?
The Email-to-Case employs Lightning threading if a particular org was created during Spring ’23 or later. To enable this feature in the existing orgs, go to Setup under the Email-to-Case settings, and find out the existing threading model.
- Ref ID Threading: In the Email-to-Case settings, if you can see Insert thread ID in the email subject and the email body, you are using the Ref ID threading. You can enable Lightning threading through a Release Update. If the Do Not Auto-enable New Features are turned off, the release update assigns the email preferences for the threading tokens according to the respective Ref ID settings for email subjects and the email bodies.
- Header-based Threading: If you have carried out the transition from Ref ID to header-based threading, or if your org had been created in Winter’21 through Winter’23, you may be using at least one Lightning threading component already, and that is header-based threading. To include token-based threading, enable Insert email threading token in the email subject and the email body, or both in the Email-to-Case settings.
Conclusion
To sum it up, Salesforce gets bigger and stronger with each release. Salesforce admins and B2B marketers look to Salesforce to give users a frictionless experience. The newest enhancements from the Spring’23 Release take these stakeholders closer to achieving their goals quickly.
If you have any questions, feel free to reach out to us at itsolutions@milestone.tech.


